Editing exception filter |
  
|
Editing exception filter |
|
|
This is exception filter dialog which is used to add or edit exception filters.
Dialog consists of two pages:
Exception Identification
Exception Identification page
Exception Identification page contains filter options which are used to find matched exception. When exception occurs:
Available options are:
1. "Exception Class" option specifies exception class name. This is mandatory option. Filter will be applied only for exceptions of the specified class. You can pick predefined classes from combo-box (such as EAbort or EAccessViolation) or enter your own classes (such as EMyException). If you want to catch all exceptions - specify "Exception" class. See also "Include child classes" option below.
Important Notes:
type
You can specify 'EMyException1' as exception class name. However, 'EMyException2' will not work. Because there is no such class: it is an alias. You should use 'Exception' instead.
2. "Include child classes" option alters behavior of "Exception Class" option.
Checked: match specified class name and any descendant classes. For example, 'Exception' class will match any exception. Unchecked: match exact class name only. For example, 'Exception' class will match only raise Exception.Create('...') constructs.
3. "Use inner exception" option alters behavior of "Exception Class" option. By default, filter checks the current exception:
try // inner exception // current (outer) exception
By checking this option you will ask EurekaLog to check base (e.g. innermost) exception instead.
This option has no effect if there are no chained exceptions - which is a typical case.
Note: this option affects only matching/identification aspect of the filter. Behavior modifications (see below) will still be applied to current (outermost) exception.
4. "Exception Kind" option specifies whenever this filter will be applicable to unhandled exceptions, handled exceptions, SafeCall exceptions or all of them. This is mandatory option.
Tip: Filter is applicable for all exceptions by default. Different processing for handled and unhandled exceptions may be confusing, so it's recommended to avoid it when possible.
Notes:
5. "Exception Handler" option specifies exception hook that had caught the exception. For example, you can use this option to separate exceptions from background threads, or separate exceptions from DLLs.
If you are handling exceptions manually - you can specify handler as third argument to EBase.HandleException function. For example:
Thread.WaitFor; begin Abort; end;
See also: how to handle exception.
6. "Exception Message" option specifies exception message to match. The "Exact match" sub-option indicates how EurekaLog should match exception message:
Important Notes:
7. "Exception Module Name" option specifies name of file for executable module. Such as 'Project1.exe' or 'BugDLL.dll'. This option is optional. Filter will be applied only to exceptions raised from the specified module.
Notes:
8. "Exception Unit Name" option specifies unit name. Such as 'SysUtils', 'Unit1', 'Project1', etc. This option is optional. Filter will be applied only to exceptions raised from the specified unit.
Notes:
9. "Source Class Name" option specifies class name. Such as 'TFileStream', 'TForm1', etc. This option is optional. Filter will be applied only to exception raised by methods of the specified class.
Notes:
10. "Procedure/Method Name" option specifies function or method name. Such as 'Create', 'Destroy', 'Read', 'Button1Click', etc. This option is optional. Filter will be applied only to exceptions raised by specified method or function.
Notes:
11. "Exception Properties" option specifies set of properties to match. This option is optional. Filter will be applied to exceptions which have specified properties with exact the same values.
Important Note: this option can only work with Delphi/C++ Builder exceptions with RTTI info available!
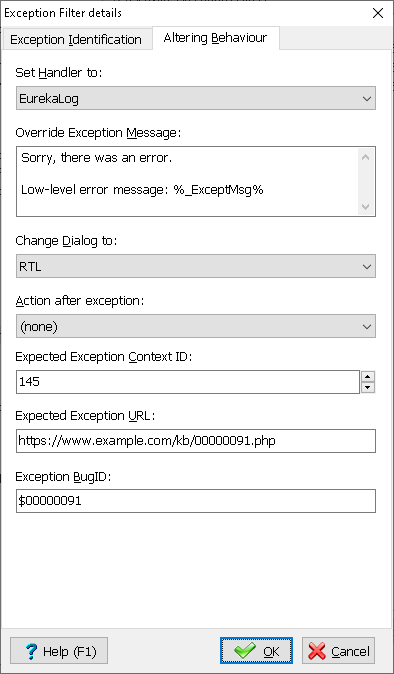
Altering Behaviour
Altering Behavior page
Altering Behavior page contains filter options which alters exceptions. These options are applied to exception altering its properties and/or behavior. Options are applied only for matched filter.
Note: at least one of the options on this tab must be changed. Otherwise filter will do nothing.
Available options are:
1. "Set Handler to" option allow you to define who should handle exception:
Tip: if you want to switch handler to "RTL" - consider using "expected" fields (see below) instead.
See also: expected exceptions.
Warning: be EXTRA careful when using the "RTL" handler in a multi-threaded application. For example, default exception handler in a VCL Forms application is a message box. The problem is that old IDE versions call this code "as is", e.g. without any synchronization. And since VCL is generally not thread-safe - you can safely show this dialog only in a main thread of your application. It means that you can't call this code from a background thread - without having thread synchronization issues. On the other hand, modern IDE versions do schedule this code to be executed in the main thread, so it can be called from a background thread. Moral of the story: study default RTL handler's code for your type of application. Learn if it can be called safely from a background thread. Avoid using RTL handler if it is not thread-safe.
2. "Override Exception Message" option allow you to override exception message. Leave this field empty to use original exception message. You can use this option to supply user-friendly error message (such as "Sorry, there was an error. Please, restart application") instead of low-level error message (such as "Access violation in module Project1.exe at address 123456"). This option affects only visual dialogs. Bug report will contain the original exception message. See also "Exception Message" option.
Note: you can use environment variables in this field, so you can also insert original exception message as part of your customized message (for example: "Sorry, there was an error. Please, restart application. Low-level error message: %_ExceptMsg%").
3. "Change Dialog to" option allow to change default dialog (as set in EurekaLog project options) to any available dialog class.
Tip: if you want to switch dialog to "RTL" or "MessageBox" - consider using "expected" fields (see below) instead.
See also: expected exceptions.
Warning: be EXTRA careful when using the "RTL" dialog in a multi-threaded application. For example, default exception handler in a VCL Forms application is a message box. The problem is that old IDE versions call this code "as is", e.g. without any synchronization. And since VCL is generally not thread-safe - you can safely show this dialog only in a main thread of your application. It means that you can't call this code from a background thread - without having thread synchronization issues. On the other hand, modern IDE versions do schedule this code to be executed in the main thread, so it can be called from a background thread. Moral of the story: study default RTL dialog's code for your type of application. Learn if it can be called safely from a background thread. Avoid using RTL dialog if it is not thread-safe.
Note: what is the difference between setting "handler" to "RTL" and "dialog" to "RTL"?
4. "Action after exception" option allow you to perform restart action after processing exception. This is useful for exceptions like access violation. You may want to terminate/restart your application after such exceptions to avoid induced exceptions.
5. "Expected Exception Context ID" option allow you to assign Context ID to exception. This is integer value which is expected to be ID of help topic describing exception.
Notes:
See also: expected exceptions.
6. "Expected Exception URL" option allow you to assign URL for the exception. This URL is expected to point to online help or Knowledge Base topic/article describing exception.
Notes:
See also: expected exceptions.
7. "Exception BugID" option allow you to specify fixed BugID for this exception. If this value is 0 - BugID will be generated automatically. If this value is not 0 - automatic generation will be disabled. Specified BugID will be used.
Note: you can use both decimal (1234567890) and hexadecimal ($C7D40000) forms.
Warning: be extra careful when assigning this value. Your value may overlap with automatically generated BugIDs. Best strategy is to utilize user part of BugID (low word). See BugID for more info.
See also:
| ||||||||||||||||||||||||||||||||||||||||||||||||||||||||||||||||||||||||||||||||||||||||||