FogBugz setup |
  
|
FogBugz setup |
|
|
This article is part of Managing bug report in issue tracker series.
See managing bug reports in issue tracker for common information. Please, read it first. For common information and setup of FogBugz itself - please see this article. The text below assumes that you already completed FogBuz installation.
Note: This article discusses configuring FogBugs for use with EurekaLog by accessing API. There is an alternative methods to send reports to FogBugs: you can use HTML facade, e.g. use HTTP upload send method to upload report directly to anonymous bug report page.
Below are detailed steps for recommended FogBugz setup for automatic bug report submission. Before going through setup - make sure to upgrade your FogBugz to the latest version.
Some steps below are optional, some steps must be executed only once (like custom fields creation), other are executed from time to time (like creating new projects for your new products).
Full list of necessary actions contains:
Please note that all actions below are just examples. It's recommendation, but it's not necessary to be absolutely like that. You may use another configuration.
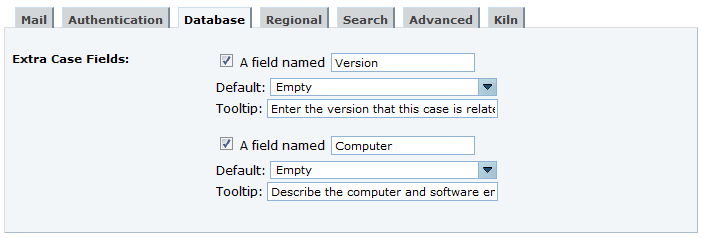
Creating custom fields1. (Admin/Site configuration) Create custom field to improve usefulness of EurekaLog. Most important field is "Version" - to store version of your application (name must be exactly like this, if you want EurekaLog to auto-fill it; otherwise you will need to fill it manually). Other suggested custom field is "Computer" (to store platform information). Again, field name must match or you'll need to manually fill it.
Suggested setup for custom fields
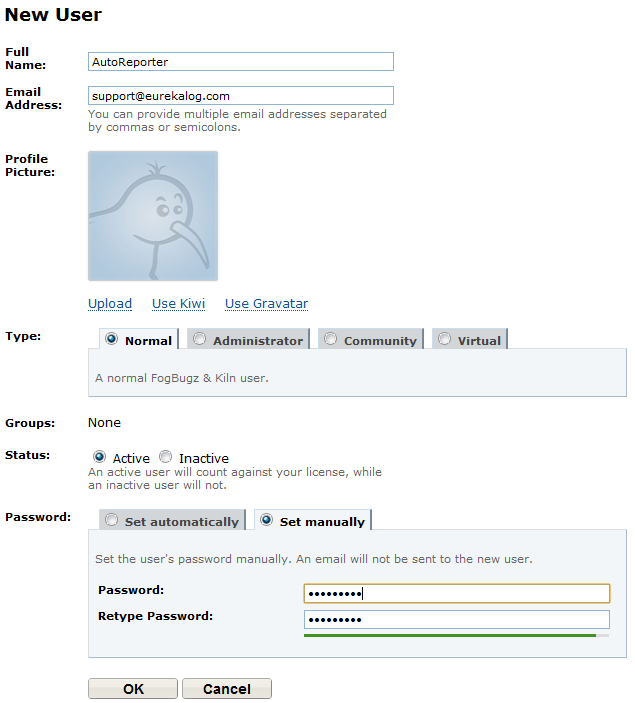
Creating user accounts1. (Admin/Users) Create new use account for bug report submission. Make it normal or community user. E-mail can be anything. It may be good idea to use dummy e-mail address (i.e. non-existent e-mail). You may want to create additional accounts for each of your products - for increased security (you can join users in group to simplify control).
Note: you can use anonymous access for bug report submissions (see also). However, currently anonymous user is not supported in FogBugz API (see also). You may also consider using HTTP upload send method to upload report directly to anonymous bug report page for reporting anonymously. Even though limited, anonymous submitting is more secure, since access password isn't stored in your EurekaLog-enabled applications, so end-user can't mess with settings.
Now, back to using real using and full access to FogBugz API.
Creating new user
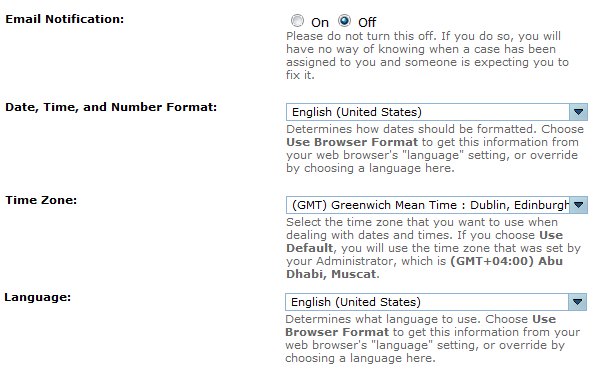
2. After creating user - click on its name in user list to edit. Turn off e-mail notifications, set settings to defaults, select "English" and "GMT":
Suggested settings for auto-reported account
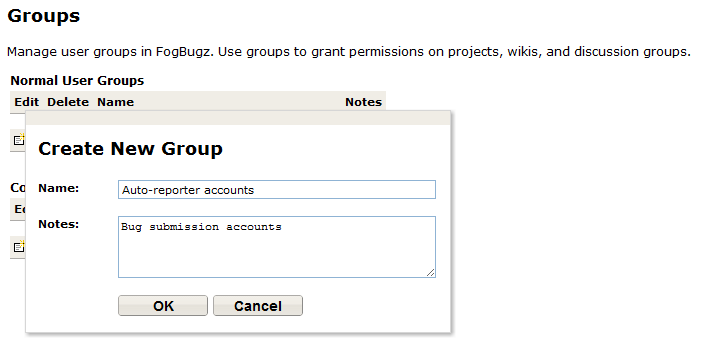
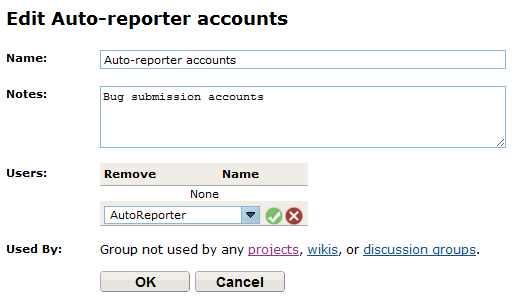
3. You can create new group for all bug submission user accounts (Admin/Groups):
Creating new group
4. After group creation - add users to it:
Adding user to group
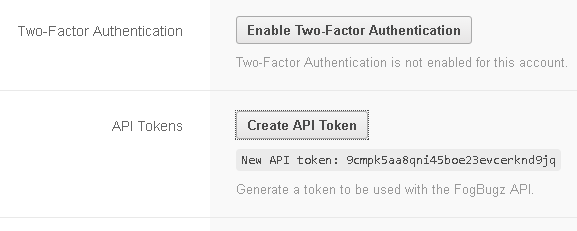
5. (Optional, but strongly recommended; only for latest FogBugz versions) Go to your account create new API token:
Creating new API token for bug reporter account
Once API token was created - select it and copy to buffer. You will need to enter it into EurekaLog settings later.
You may create additional tokens.
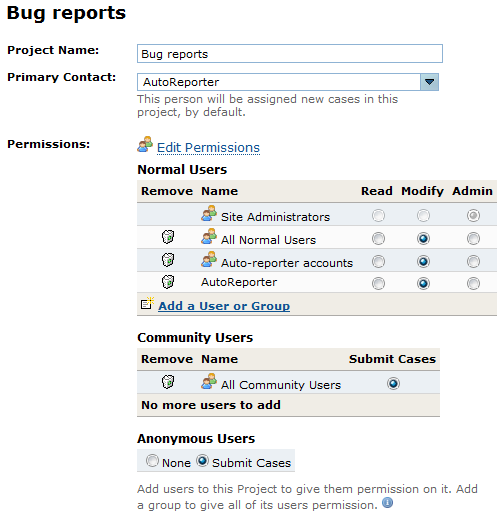
Creating projects1. (Admin/Projects) Create project for your product. You may also create several projects - one for each of your products. In this case you may want to create common master project. You can use master project to clone settings to many projects. You can also group projects into a group. Be sure to set appropriate access rights for users (depends on your choice for bug report submission: normal user, community user or anonymous):
Example of project for bug report submission
Example above illustrates setting access rights for the following cases:
Please, select only minimum necessary access rights and remove any other.
2. Create area for the projects. If you don't need area - use "Misc" area. If you already have area - assign it. If you have master-project - you can clone project to get pre-set settings.
3. Set any other project properties as needed.
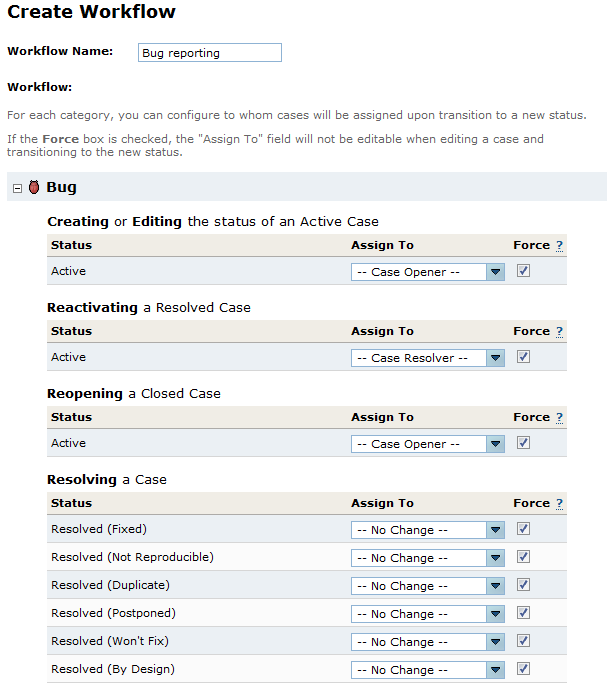
4. (Admin/Workflows) Create custom workflow to limit rights:
Suggested settings for the workflow for bug reporting projects
Assign workflow to your projects.
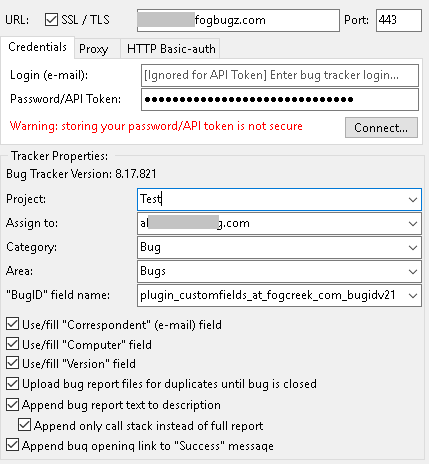
EurekaLog setup1. Enter FogBugz details into EurekaLog settings of your projects:
ForBugz settings filled into EurekaLog options
Important Note: we recommend to use API keys (tokens) when possible. If you are still going to use login/password pair (for example, you are using old FogBugz version, which does not have API keys) - use your user name as login. Even though FogBugz asks for e-mail address as login, we've found out that it's perfectly fine to have several users with same e-mail account, and login with user names instead of e-mail addresses.
2. Set any additional/common send options.
3. Set/fill custom fields. EurekaLog has support for automatic managing of "Version", "Computer", "Correspondent" and "BugID" fields. You just need to set corresponding check boxes and field name in EurekaLog options. For other custom fields you need to fill them manually, for example:
uses EEvents, ESysInfo;
procedure SetCustomFields(const ACustom: Pointer; AExceptionInfo: TEurekaExceptionInfo; ASender: TObject; AWebFields: TStrings; var ACallNextHandler: Boolean); begin AWebFields.Values['plugin_customfields_at_fogcreek_com_licensev5'] := GetYourApplicationLicense; end;
initialization RegisterEventCustomWebFieldsRequest(nil, SetCustomFields); end.
4. Add any custom data, additional attached files, write necessary event handlers, set exception filters, etc, etc.
Testing1. Test sending. You can do this right in the EurekaLog send options dialog - by clicking on "Test..." button. This will send test bug report.
Suggested actions are:
These actions should test that sending is actually working.
2. Now it's time to test your application-specific sending.
Now your application is ready for deployment.
See also:
| ||||||||||||||||||||||||||||||||||||||||||||||||||||